
Learning Objectives
- Use MobileStaff to track event attendance.
Using MobileStaff for Attendance
The Events feature in MobileStaff allows librarians and other staff to take and track attendance for events. Read over the following information to determine if this is a feature that would benefit your library.
Note: The Events feature is not available by default. To enable this option, contact your INFOhio Provider and inform them of your interest in MobileStaff Events. They will discuss the options available to you.
Before using Events, there are a few steps that must be completed first, to successfully take and track attendance for an event. First, a new item group and a GUEST user account must be created. If people attending events do not have a library barcode or student ID to check in with, the GUEST user will need to be used. The GUEST user could be used for community members, parents, or others outside of the school.
These settings should be created by or with the guidance of your INFOhio Provider. Ensuring that a new item group and GUEST user account have been created prior to using Events will allow you to track user attendance as well as specific events and user activity. One other option to discuss is whether or not turning on patron history is beneficial to your needs. Turning on patron history will allow you to see who has attended an event without the need of a report.
Enabling Events in MobileStaff
- Your INFOhio Provider will add an Item Group, called Event, to your current list of Item Groups.
- Your INFOhio Provider will create a GUEST User.
In MobileStaff:
- Log into MobileStaff using your credentials.
- Navigate to Setup. Click Event.
- Check the box next to Enable Event Attendance.
- If you want to prevent patrons from being able to exit self-service mode, select Disable Self-Service Sign Out Button. (Removes the logout icon in the top right corner of MobileCirc.) Self-Service simplifies the screen and the only way out is for the librarian to enter their WorkFlows password.
- If a Guest user has been created, type GUEST (or whatever User ID was created for the GUEST user) in the Event Guest User field. The Guest Attend option enables the tracking of attendance without tracking attendees.
- Click Apply.

In WorkFlows/BLUEcloud Cataloging:
- Create a bib record to keep track of an event.
- Use Add Brief Title in WorkFlows (under the Item Maintenance wizard group) and create a record using the Brief Title template. The directions below are for WorkFlows, but this process can easily be replicated in BLUEcloud Cataloging using +New Record and the Brief Record Template.
- Use the title field as the event name.
- You could change the Call Number to EVENT (or something similar, and possibly include the date), change the library, and set the item type to be EVENT.
- Item ID – if barcode validation is turned off, you could make the Item ID something easy to remember (EVENTmmddyyyy) but if not, auto-generate an Item ID or use a dumb barcode. This barcode will be used to pull up the event in MobileCirc.
- Shadow this record at the call number level so it isn’t searchable for your users in ISearch.
- To shadow your record, save your Event and open Call Number/Item Maintenance (found in the Cataloging wizard group). Pull up your record and locate the call number information found under the Item Info tab. Check the box next to Shadow Call Number. Click Save. This call number is now shadowed from the online catalog.

- Click Add Brief Title when finished.

To Track Attendance for an Event:
- In MobileCirc, click Event.
- Enter the Barcode of the Event you created (ex. 32612000083497).

- Users can then enter their User ID to be tracked for this event. If there is more than one attendee per user, manually change the # of Attendees.
- ALT IDs work here as well.

- If you don’t want to allow User Search or the switching of events, you can enter self-service mode.
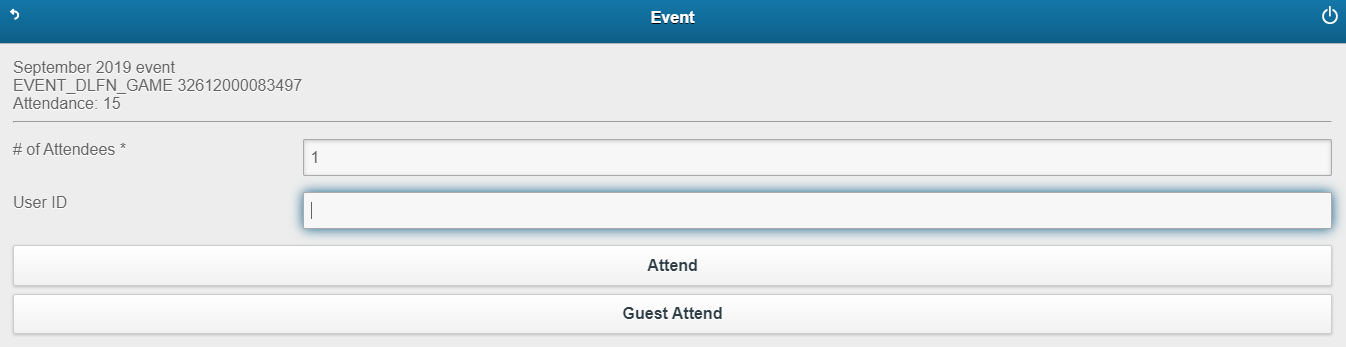 This will only allow the # of Attendees and the User ID to be scanned. If you assigned a GUEST user in Setup, attendees will also have the ability to check in as a Guest User with Guest Attend. To return to the regular screen, click the back arrow and you will be prompted for your password. Enter that and you will be taken to the Event screen.
- If a user is blocked for some reason – overdues, bills, etc. you will have to use the override password to allow the user to attend the event.
- As users attend the event, the number in attendance will increase.
Reporting and Tracking Event Attendance
- Patron History - If Patron History is turned on in WorkFlows, library staff will be able to access attendee information through Item Search/Display found in the Common Tasks wizard group.

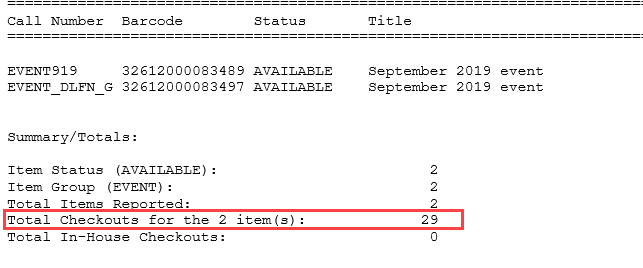
- Shelf List - Run the Shelf List report, using the Event's Item ID in the Item ID tab to get a total of the number of attendees for that Event. Or, run the report by selecting the Event Item Group under the Item Selection tab and get a total of attendees for ALL Events.

- Scan History Logs - Your INFOhio Provider can run the Scan History Logs report using the Event's Item ID to report attendee information. Please contact your INFOhio Provider for further details.

