When determining whether to add a new call number, keep in mind that one of the following two things should be true:
Your library does not already have a call number cataloged for the item.
You want to add a copy to a record with a unique call number not currently used.
If your library already has a call number created for a record, you may need to only add an item.
Search for a record matching the item you would like to catalog. If a matching record is not available in your district's database, see the Importing Bibliographic Records lesson in this BLUEcloud Cataloging class for more information on how to find the record you need.
Click the title (or cover art) to open the record and view the bibliographic information. Verify that the information matches the item information of the title you would like to catalog.
Click Manage Holdings to see the call numbers already cataloged.
Click an available call number to access the item information fields.
Click New Call Number.
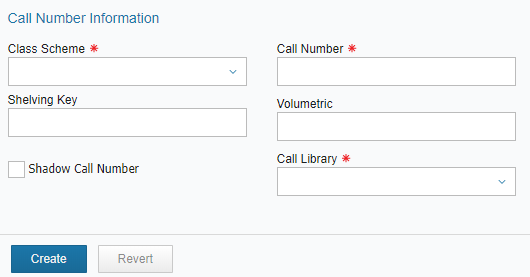
Enter the required information noted by a red asterisk.
Class Scheme: Select ATDEWEYLOC.
Call Number: When entering the call number, enter AUTO as the initial call number. This will ensure the call number is unique. The call number must be unique for the system to allow you to save. If you don't use AUTO as the initial call number you run the risk of receiving an error message because the call number isn't unique. You must have a barcode assigned for a call number to be unique.
Call Library: The library that will own the item being cataloged.
You can shadow the call number by clicking the box next to Shadow Call Number. This will hide the call number and any associated items in the online catalog. If this is a textbook or piece of equipment you may not want the general population to be able to search, find, or request that item.
Volumetric: This will display the individual volume number if populated.
Click Create. You have created and added a call number!
Take a moment to pause and try adding a call number yourself!
Search for a record in your district’s database.
Select a title by clicking the book cover.
Use Manage Holdings to add a call number.
Click a previously cataloged call number to add an additional call number to the record.
Click New Call Number.
Assign AUTO as the call number placeholder.
Fill in the necessary information.
Click Create.
Read on to find out how to finish cataloging by adding an item and editing the call number.
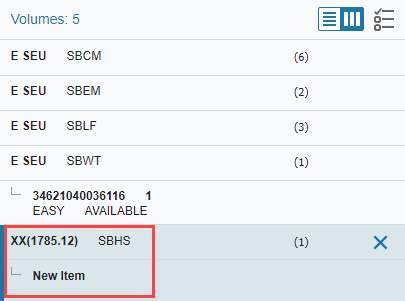
Choose the correct Call Number to which to add the new item. If there is only one call number this will not be necessary. The call number selected will determine the owning library and the specific call number.
Click New Item.
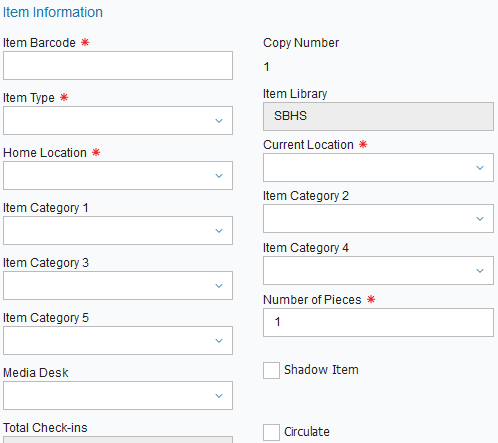
A New Item will be created. On the right side of the screen, in the Call Number and Item Information, enter the desired information for the item created. Fields indicated by a red asterisk are required fields.
Please keep in mind that item information will be copied if a previously cataloged item was highlighted when New Item was clicked.
To add an item barcode, scan or enter a dumb label.
Continue to fill out item information as needed.
Item Type: Item Group
Home Location and Current Location: Set to Available.
Item Category 1: Material Type
Item Category 2: Funding Source
Item Category 3: Curricular Area
Item Category 4: Grade Level
Item Category 5: Genre
Circulate: Check the box. If the box is not checked, the item will not circulate to patrons without an override.
Permanent: Check the box to indicate this is a permanent part of the collection.
Price: Add a price.
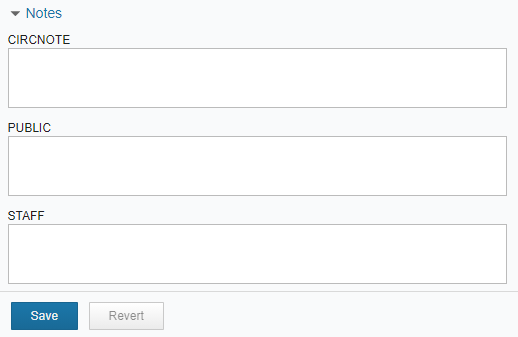
Notes: Circnote (note appears when item circulates), Public (note appears in the online catalogs), and Staff (note appears only to library staff in library services platform).
Make other additions or changes to fields as needed.
Once completed, click Create.
If the call number is still reflecting an XX call number, now is the time to update it. Edit the call number and click Save to finish.
You have now created and added an item!
Now that you've learned how to add an item, pause to continue the activity from above.
Once you have added a call number, click New Item.
Assign a barcode by scanning or entering a dumb barcode.
Fill in other item fields as needed.
Click Create.
Change the Call Number to its correct form.
Click Save.
You have now added a call number and an item. If you have any questions about this process, please contact your INFOhio Provider for further help.
If needed, there are three item note fields available for use. These are not required fields.
Circ Note - A circ note will display when an item is circulated. Currently, this feature is unavailable in BLUEcloud Circulation.
Public Note - A public note will display in the library OPAC.
Staff Note - A note will display to library staff. This feature is currently unavailable in BLUEcloud Circulation.
Updating an item note field will automatically update the corresponding fields in Workflows. When finished editing the notes fields, click Save.
Next, you may need to create and print barcodes and spine labels after you have finished cataloging. Please see the Printing Barcodes and Spine Labels lesson in the Introduction to Cataloging class for directions on how to do this.
Once you have finished this lesson, click the Next button to move to the next lesson on Batch Modification. If you have any questions, please contact your ITC's Library Support Staff for help.